
Know what’s happening
Access the private noticeboard for verified neighbours near you. Keep informed about any suspicious activity, send urgent updates to your neighbours when required and discuss emergency planning.
Get to know your neighbours
Browse the directory and start getting to know your neighbours. Don’t want to post to the whole neighbourhood? Send a private message.
Buy, sell and give away
Want to declutter your garage? Buy some used household items? Give away some garden stuff? Become a verified neighbour to browse and post items for sale. Trading is simple when everyone lives nearby.

Does your organisation need new flooring?
Apply for up to $2,000 and also be in to win a $20,000 makeover.

Thank you for using Neighbourly
You may receive an email confirmation for any offer you selected. The associated companies will contact you directly to activate your requests.
Robert Anderson from Curtain Clean Palmerston North
When researching or reading about different fabrics, you are likely to see the word yarn mentioned a lot. ‘Made from spun yarns’ or ‘with synthetic yarns’ are a couple of examples. But what is yarn? What is spun yarn? Are there other types? What does it all mean, and how much relevance does… View moreWhen researching or reading about different fabrics, you are likely to see the word yarn mentioned a lot. ‘Made from spun yarns’ or ‘with synthetic yarns’ are a couple of examples. But what is yarn? What is spun yarn? Are there other types? What does it all mean, and how much relevance does this bear to your final fabric? That’s what we are here to look at in a little more detail.
What is Yarn?
Yarn is a length of fibres. That’s the simplest way to explain it. It is a continuous length of fibres which are interlocked, and it’s used to produce fabrics, as well as in crocheting, knitting, embroidery and ropemaking.
This means that we can split yarn into two different ‘categories’ of sorts. The thread that is used for embroidery or in sewing machines, as well as yarn (commonly known as balls-of-wool) used in crafts such as knitting or crocheting, are long lengths that are bought as yarns.
The alternative would be a yarn which is then knitted or woven into a fabric. The textile is then bought as fabric, in lengths, rather than the yarn itself being purchased separately. This second description is the one that we will explore further in this post.
What is Yarn Made From?
Yarn can be made from such a variety of different fibres. This includes both natural and synthetic fibres. The most common plant fibre is cotton, however, you can also use other natural fibres such as bamboo. Alongside cotton, the synthetic polyester fibre makes up the two most commonly used fibres. Animal fibres are also often used, such as wool, harvested from sheep, as well as cashmere (harvested from goats) Angora (from rabbits) and silk (from insect larvae).
What is the Difference Between Spun and Filament Yarn?
Spun yarn is made by twisting staple fibres together in either an S or Z twist, to make a single thread. The process of twisting the fibres together into yarn is called spinning and it was one of the first processed to be industrialised. Spun yarns can contain a single type of fibre, or you can spin various types of fibre together to give you a blend.
Filament yarn is made up of filament fibres which are either twisted together or simply grouped together. It can either be composed of one filament, which is called a monofilament, or it could be made of more than one, in which case it would be known as a multifilament. This can be as few as two or three filament fibres, or even up to 50, or more.
Keep reading: www.curtainclean.co.nz...

Mei Leng Wong Reporter from NZ Gardener & Get Growing
Dear neighbours,
Please meet Alyce Read of Nelson, who uses her houseplant collection to connect with others and help them overcome mental health challenges. "You wouldn’t take a plant and put it in a dark corner and fail to water it and expect it to thrive. So we should look at ourselves … View moreDear neighbours,
Please meet Alyce Read of Nelson, who uses her houseplant collection to connect with others and help them overcome mental health challenges. "You wouldn’t take a plant and put it in a dark corner and fail to water it and expect it to thrive. So we should look at ourselves that way," she says. "If we are not thriving in the way that we would wish, it might not be any fault of ours, it might be the conditions that we are under."
The Team from Neighbourhood Support New Zealand
All it takes is a kind gesture to change someone’s day. From giving flowers to a neighbour ‘just because’ to paying it forward in line at a cafe - this month we’re encouraging our members and supporters to make New Zealand a better place one random act of kindness at a time.
The options … View moreAll it takes is a kind gesture to change someone’s day. From giving flowers to a neighbour ‘just because’ to paying it forward in line at a cafe - this month we’re encouraging our members and supporters to make New Zealand a better place one random act of kindness at a time.
The options for doing so are endless! Being kind doesn’t have to cost a thing, after all a smile is free. For those who want to go the extra mile, here’s some other ideas: take a gift over to new neighbours and introduce yourself, build a free community library for your street, buy extra kai at the grocery store to donate to a food bank, bring treats into work for colleagues, send an encouraging text to someone who needs it, let a car into the traffic ahead of you, write positive messages in chalk on sidewalks around your neighbourhood, or surprise loved ones with a visit.
Want to share your thoughts? Let us know how you’re spreading kindness this month by tagging us in your social media posts or emailing us your photos, videos, or experiences to:
info@neighbourhoodsupport.co.nz

Julia Wallace Retirement Village
We developed our Ryman Peace of Mind Guarantees to protect residents and their families.
For example, you can be 100% sure there are no hidden costs. This means no standard refurbishment fees, no surprise costs when you move in and no administration fees.
Read more about our Julia Wallace … View moreWe developed our Ryman Peace of Mind Guarantees to protect residents and their families.
For example, you can be 100% sure there are no hidden costs. This means no standard refurbishment fees, no surprise costs when you move in and no administration fees.
Read more about our Julia Wallace village and our Peace of Mind Guarantees.

Tione from Rongotea - Awahuri
Hello Palmerston north,
I am a mobile nail tech who's recently started out.
I've noticed the huge demand for nails and the so little time people have.
New mothers & women who work full time and have busy lives, and a lot more.
So what I can offer to those Busy women is a bit of … View moreHello Palmerston north,
I am a mobile nail tech who's recently started out.
I've noticed the huge demand for nails and the so little time people have.
New mothers & women who work full time and have busy lives, and a lot more.
So what I can offer to those Busy women is a bit of pampering in the comfort of their own home.
Feel free to message me with any questions or if you would like to see more of my work.
TRAVEL FEE APPLIES
Palmerston north $10
Fielding $5
Ashurst $20
Thanks :)
Price: $30
Raewyn from Awapuni
On Saturday around 9.30pm I saw a bunny bounding across Rugby Street, near the shops, into the gap that leads to Awapuni Park. I have put this on Manawatu Lost & Found Pets too. Sorry I didn't take any notice of colour. Good luck if its someone's pet.
Amy Houben from Awapuni Vege Hub
A friendly reminder that the Awapuni Vege Hub $15 orders of fresh fruit and veg close this Monday at midnight.
Contents this week:
Broccoli, Kumara, Pumpkin, Carrots, Banana, Oranges, Kiwifruit Green
Order and pay via Internet Banking. Instructions attached below.
We currently have pick up … View moreA friendly reminder that the Awapuni Vege Hub $15 orders of fresh fruit and veg close this Monday at midnight.
Contents this week:
Broccoli, Kumara, Pumpkin, Carrots, Banana, Oranges, Kiwifruit Green
Order and pay via Internet Banking. Instructions attached below.
We currently have pick up points in Highbury, Awapuni, and Central City.
The Vege Hub Team

Xara from Awapuni
Selling on behalf of daughter, who has hand eye co ordination issues, so not suitable. We have added a rear view mirror. Bike pump in photo not included.
With a lower step frame, this is super easy to get on/off and paired with a Nexus internal gear hub gear changing is smooth and can be done in … View moreSelling on behalf of daughter, who has hand eye co ordination issues, so not suitable. We have added a rear view mirror. Bike pump in photo not included.
With a lower step frame, this is super easy to get on/off and paired with a Nexus internal gear hub gear changing is smooth and can be done in a stationary position.
The battery is located under the rear basket so can be left in there to charge or slides out. There is also a 2nd mount available for an extra battery.
Come with waterproof cabling and also a reverse feature.Use it as a normal trike without the electric feature or switch the assistance on.
Also comes with a full electric feature by using a thumb throttle to drive the trike. Up to 80km on a battery charge and a programmable display to restrict speed or power if needed. Also listed on Trademe.
PM if you would like to view or test ride
Price: $3,500
The Team from Digital Boost
Are you a small business owner looking to make better use of the online space?
Digital Boost is a free online learning platform packed with 3-5 minute educational videos on topics like:
- Websites
- Digital marketing/social media
- Online tools
- Digital accounting
- Business insights, … View moreAre you a small business owner looking to make better use of the online space?
Digital Boost is a free online learning platform packed with 3-5 minute educational videos on topics like:
- Websites
- Digital marketing/social media
- Online tools
- Digital accounting
- Business insights, feedback and reporting
- Future technologies
Plus, pick up tips and tricks from our interviews with other small business owners across the nation.
The future is digital and we want your business to be part of it.
Sign up today

Heather from Roslyn - Terrace End
Good morning neighborly Community. I have had the privilege of responding to and meeting John Harding and I would like to share my experience of his situation.
John is a high functioning, fully present independent senior gentleman who has lived his life serving others. Sadly as for a lot of us as … View moreGood morning neighborly Community. I have had the privilege of responding to and meeting John Harding and I would like to share my experience of his situation.
John is a high functioning, fully present independent senior gentleman who has lived his life serving others. Sadly as for a lot of us as he has journeyed through life and is now navigating his senior years his body is not what it once was. This dear man has made several pleas for assistance on this community site for help the last of which was for someone perhaps a young fellow who would like to earn some Money to put his bin out.
I felt really sad that in large the responses were from people with seemingly good ideas of who he should approach and or questioning the validity of what he was saying. Perhaps it is not for us to question but rather just to simply consider here is a man with a need and lets just show up and assist with that need. Maybe it's possible to consider John isn't broken and in need of fixing he just needs someone to put his bin out. Just a thought. Since John's pleas for help he has had the additional trauma of loosing his 98 year old Father whom he had come back to Palmerston North to care for. Spare a kind word or a message of encouragement and support for John today. Thankyou.
12 replies (Members only)
Stephanie from Levin
Hello neighbours, Here at Ucol Beauty Therapy School, Level 1, 160 Oxford Street, Levin, we will be needing clients for trained students. Client days will be Fridays, starting Friday 13th August, 9.30am - 3.30, bookings can be made by email, levinbeauty@ucol.ac.nz or 06367 2613. Please … View moreHello neighbours, Here at Ucol Beauty Therapy School, Level 1, 160 Oxford Street, Levin, we will be needing clients for trained students. Client days will be Fridays, starting Friday 13th August, 9.30am - 3.30, bookings can be made by email, levinbeauty@ucol.ac.nz or 06367 2613. Please leave your name and phone number for the st;udent on reception dut;y to contact you to organise an appointment time. Treatments available:
Manicures, Manicure $15, Pedicure $15, Gel Polish $15,
Facials, Express Facial $10, Deluxe Facial $20,
Eyes, Eyebrow Shape $10, Eyebrow Tint $10, Eyelash Tint $10,
All Three together $20
Makeup $10,
Waxing: Legs, Arm, Facial, Underarms, Bikini, All $10
Thanks for your support, Stephanie Student at Ucol Beauty School, Levin
Negotiable
Robert Anderson from Curtain Clean Palmerston North
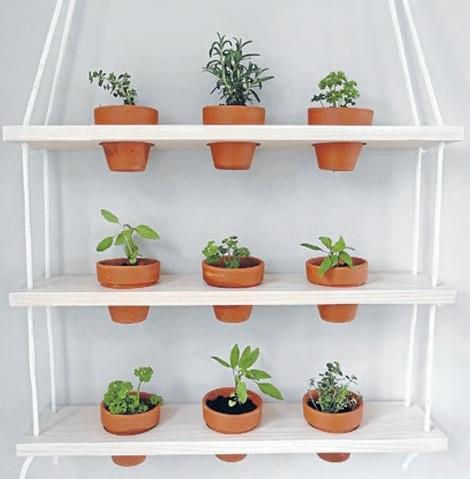
If you enjoy growing your own potted plants and would like a stylish way of displaying them inside the home, then this month's project could be just what you need. I've been admiring living walls and hanging gardens for some time now, and decided to create an achievable small-scale … View moreIf you enjoy growing your own potted plants and would like a stylish way of displaying them inside the home, then this month's project could be just what you need. I've been admiring living walls and hanging gardens for some time now, and decided to create an achievable small-scale version to house small pots and fresh herbs in my kitchen. These shelves are affordable and easy to make, and ideal for apartments and smaller homes without much garden space.
For this project you will need:
• 1 length of untreated pine 20mm thick and 120mm wide
• Hand saw or skill saw, sandpaper
• Drill with 72mm hole saw drill bit and 7.5mm drill bit (for 7mm rope)
• 9 x 9cm terracotta pots
• White synthetic general purpose rope 7mm x 10m, 8 x white plastic cable ties
• Resene Colorwood Whitewash, speed brush or synthetic paintbrush
• Various herbs or small plants
Step one: Cut your length of pine into three pieces, each 600mm long. You can do this with either a hand saw or a skill saw. Once cut, give them a sand.
Step two: Measure out the placement of your holes that will hold the terracotta pots. I spaced mine out at 150mm centres. Repeat these markings for all three lengths of timber.
Step three: Using a drill with a hole saw attachment, cut out 72mm (D) sized holes to fit your terracotta pots. I practised first on a spare cut of timber I had lying around, to make sure that the hole I was drilling was the right size. For my 9cm pots, I found that 72mm ensured a good fit. Tidy up each hole with a light sand.
Step four: Now you need to cut the holes for your rope. Measure in 20mm from each corner and mark your drilling spot. Use a 7.5mm drill bit to make one hole in each corner (the size drill bit you use will depend on the thickness of the rope you are using to hang your shelves – adjust accordingly). Repeat for all three lengths of timber.
Step five: To achieve a fresh, clean look I used Resene Colorwood Whitewash interior wood stain. There are lots of colours to choose from, so you could pick whichever best suits the timber you are using and where the finished project will be hanging. I applied two coats of Whitewash using a speed brush, or synthetic brush.
Step six: Cut your rope into four equal lengths and thread each length through the corner holes of your shelves starting from the bottom. Tie each length of rope into a knot on the underside of the bottom shelf, so the bottom shelf rests on these knots.
Step seven: Adjust the placement of your shelves until you get them evenly spaced. Make sure you allow room for the pots to sit in the shelves, and room for your plants to grow of course. I spaced my shelves at 200mm apart. Secure the undersides of your remaining shelves with cable ties, they are a good solution because they aren't hugely visible and they don't budge. Trim the long ends of the cable ties once in place.
Step eight: Add your pots and plants, and hang in your chosen spot. Make sure that you use hooks that can safely take the weight of your shelves.
DIY with pictures: www.curtainclean.co.nz...
Robert Anderson from Curtain Clean Levin
If you enjoy growing your own potted plants and would like a stylish way of displaying them inside the home, then this month's project could be just what you need. I've been admiring living walls and hanging gardens for some time now, and decided to create an achievable small-scale … View moreIf you enjoy growing your own potted plants and would like a stylish way of displaying them inside the home, then this month's project could be just what you need. I've been admiring living walls and hanging gardens for some time now, and decided to create an achievable small-scale version to house small pots and fresh herbs in my kitchen. These shelves are affordable and easy to make, and ideal for apartments and smaller homes without much garden space.
For this project you will need:
• 1 length of untreated pine 20mm thick and 120mm wide
• Hand saw or skill saw, sandpaper
• Drill with 72mm hole saw drill bit and 7.5mm drill bit (for 7mm rope)
• 9 x 9cm terracotta pots
• White synthetic general purpose rope 7mm x 10m, 8 x white plastic cable ties
• Resene Colorwood Whitewash, speed brush or synthetic paintbrush
• Various herbs or small plants
Step one: Cut your length of pine into three pieces, each 600mm long. You can do this with either a hand saw or a skill saw. Once cut, give them a sand.
Step two: Measure out the placement of your holes that will hold the terracotta pots. I spaced mine out at 150mm centres. Repeat these markings for all three lengths of timber.
Step three: Using a drill with a hole saw attachment, cut out 72mm (D) sized holes to fit your terracotta pots. I practised first on a spare cut of timber I had lying around, to make sure that the hole I was drilling was the right size. For my 9cm pots, I found that 72mm ensured a good fit. Tidy up each hole with a light sand.
Step four: Now you need to cut the holes for your rope. Measure in 20mm from each corner and mark your drilling spot. Use a 7.5mm drill bit to make one hole in each corner (the size drill bit you use will depend on the thickness of the rope you are using to hang your shelves – adjust accordingly). Repeat for all three lengths of timber.
Step five: To achieve a fresh, clean look I used Resene Colorwood Whitewash interior wood stain. There are lots of colours to choose from, so you could pick whichever best suits the timber you are using and where the finished project will be hanging. I applied two coats of Whitewash using a speed brush, or synthetic brush.
Step six: Cut your rope into four equal lengths and thread each length through the corner holes of your shelves starting from the bottom. Tie each length of rope into a knot on the underside of the bottom shelf, so the bottom shelf rests on these knots.
Step seven: Adjust the placement of your shelves until you get them evenly spaced. Make sure you allow room for the pots to sit in the shelves, and room for your plants to grow of course. I spaced my shelves at 200mm apart. Secure the undersides of your remaining shelves with cable ties, they are a good solution because they aren't hugely visible and they don't budge. Trim the long ends of the cable ties once in place.
Step eight: Add your pots and plants, and hang in your chosen spot. Make sure that you use hooks that can safely take the weight of your shelves.
DIY with pictures: www.curtainclean.co.nz...

The Team from Neighbourhood Support New Zealand
Join the movement to help make Aotearoa a better place to live!

Michelle from Linton
Hi everyone, are there any suggestions please for a nice café that has a reasonably priced lunch menu? Any suggestions from places you have been to are appreciated. Many thanks. 😊
18 replies (Members only)
 Loading…
Are you sure? Deleting this message permanently removes it from the Neighbourly website.
 Loading…

 Buyers $799,000+


 Marketed by Blair Alabaster

 Buyers $799,000+


 Marketed by Taylor Quine

 Buyers $875,000+


 Marketed by Andrea O'Donnell

 Enquiries Over $679,000


 Marketed by Aman Singh
 Tender


 Marketed by Kay Nitschke

 Deadline Sale


 Marketed by Kay Nitschke

 Buyers $849,000+


 Marketed by Taylor Quine

 Buyers $575,000+


 Marketed by Jo Davenport
© Neighbourly 2024
